Selenium Java Maven Dependency: Installation and Usage

Are you looking to automate your software testing using Selenium and Java, but don't know where to start? Don't worry, you're not alone. Many beginners face challenges when it comes to setting up Selenium Java Maven Dependency for their projects.
Selenium is a popular open-source test automation framework that allows you to automate web browsers. It's compatible with several programming languages, including Java, which is one of the most widely used languages for test automation.
Maven is a powerful build automation tool for Java projects. It simplifies the process of managing dependencies, building and deploying your code, and managing project configurations. Combining Selenium with Maven can help you streamline your test automation process and improve productivity.
In this article we will learn : -
- how to manage selenium maven dependency
- selenium webdriver manager integration with maven dependencies
- code a selenium maven project
- why we use maven in selenium
- maven command to run selenium tests
Here's a step-by-step guide on how to install and use Selenium Java Maven Dependency for your test automation projects:
Step 1: Install Java and Maven
Before you can install Selenium Java Maven Dependency, you need to install Java and Maven on your system. You can download and install the latest version of Java from the official website. Maven can be downloaded and installed from the Apache Maven website.
Step 2: Create a Maven Project
Once you have installed Maven, you can create a new Maven project using the following command in the terminal:
mvn archetype:generate -DgroupId=com.example -DartifactId=my-app -DarchetypeArtifactId=maven-archetype-quickstart -DinteractiveMode=false
Step 3: Add Selenium Dependency to the Pom.xml File
The pom.xml file is the project object model file for Maven projects. It contains all the dependencies, plugins, and configurations required to build and deploy your code. To add Selenium dependency to the pom.xml file, you need to add the following code:
<dependency>
    <groupId>org.seleniumhq.selenium</groupId>
    <artifactId>selenium-java</artifactId>
    <version>3.141.59</version>
</dependency>
This code will add the Selenium Java dependency to your project.
Step 4: Create a Test Case
Now that you have set up the project and added the Selenium dependency, you can create a new test case to automate a web browser. You can create a new test case using the following
import org.openqa.selenium.WebDriver;
import org.openqa.selenium.chrome.ChromeDriver;

public class AppTest {

    public static void main(String[] args) {

        System.setProperty("webdriver.chrome.driver", "path/to/chromedriver");

        WebDriver driver = new ChromeDriver();

        driver.get("https://www.techoral.com");

        driver.quit();
    }
}
This code will open a new Chrome browser window, navigate to Google, and then close the browser.
Step 5: Run the Test Case
To run the test case, you need to navigate to the project directory in the terminal and run the following command:
mvn test
This command will compile your code, download the necessary dependencies, and run the test case.
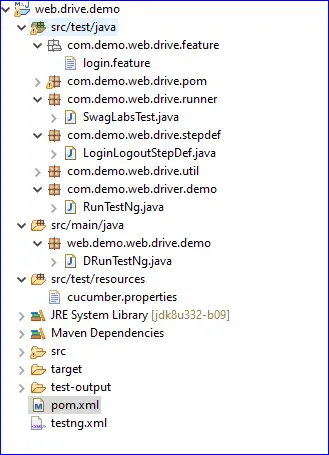
Java Selenium with Maven - Demo project ( working)
Here is the soure code of Java Selenium project built using maven. Please find the git repo details below.
https://github.com/deonash/automation/blob/main/web.drive.demo/pom.xml

Selenium Java Maven Dependency can help you automate your web browser testing and improve your productivity. By following the above steps, you can easily set up Selenium Java Maven Dependency in your test automation projects and start writing test cases.
Read Next :
- Selenium WebDriver API
- Selenium WebDriver Setup
- Selenium Maven Dependancy
- Selenium Locators
- Selenium with Maven
- Selenium Page Object Model (POM)
- Selenium TestNG
- Selenium Handling Alerts
- Selenium Handling Frames and Windows
- Selenium Waits
- Selenium Cross-browser Testing
- Selenium Reporting
- Selenium Stale Element Exception
- TestNg Class Version Error
- Selenium IDE Download & Installation on Chrome
- Selenium IDE Download & Installation on Microsoft Edge
- Selenium IDE Download & Installation on Mozilla Firefox
- Selenium vs Cypress vs Puppeteer
- Selenium Interview Questions
Selenium Tutorials
- Setting up selenium IDE - Download and install selenium IDE on windows
- Selenium vs Cypress vs Puppeteer
- Selenium Interview Questions
- Selenium WebDriver API
- Selenium WebDriver Setup
- Selenium Maven Dependancy
- Selenium Locators
- Selenium with Maven
- Selenium Page Object Model (POM)
- Selenium TestNG
- Selenium Handling Alerts
- Selenium Handling Frames and Windows
- Selenium Waits
- Selenium Cross-browser Testing
- Selenium Reporting
- Selenium Stale Element Exception
- TestNg Class Version Error
- Selenium IDE Download & Installation on Chrome
- Selenium IDE Download & Installation on Microsoft Edge
- Selenium IDE Download & Installation on Mozilla Firefox
- Selenium vs Cypress vs Puppeteer
- Selenium Interview Questions
Cypress Tutorials
Cypress Archives
- Cypress Installation Errors
- How to Install Cypress
- Cypress Uncaught Exception Handling
- Cypress Automation Examples
- Cypress Automation Tool Interview Questions
- Cypress File Upload Examples
- Error 509 Bandwidth Exceeded
- Cypress Commands
- Cypress Custom Commands
- Handling Cypress Tokens & LocalStorage
- Handling Cypress Multitabs
- Cypress Parallelization
- Cypress waits
- Cypress Still Waiting Error
- Cypress Test Run Errors
- Cypress vs Selenium vs Puppeteer
- Cypress vs Selenium
- Cypress vs Puppeteer