How to Download and Install OpenJDK 7 on Windows 10

Quick guide to download and install OpenJDK 7 on Windows. - OpenJDK Community Version
What is OpenJDK
OpenJDK is the short form of Open Java Development Kit similar to Oracle's Java Development Kit used to develop Java Applications. Main difference between Oracle JDK and OpenJDK is that OpenJDK is free for all while Oracle Java Development Kit or Oracle JDK requires commercial license. For more details refer openjdk vs oracle jdk
If you want to know more about OpenJDK, you can go through Open Java Development Kit Quick guide.
Note: To uninstall previously installed OpenJDK please refer Uninstall OpenJDK Windows
Step #1: Download
There are many OpenJDK vendors out there in the market ( here is the OpenJDK Vendors List ), you can download OpenJDK from AdoptOpenJDK, Redhat OpenJDK, Zulu OpenJDK or from Community OpenJDK.
Below are the steps to download and install Community OpenJDK. If you would like to install OpenJDK from other vendors please refer :
- install openjdk on redhat
- install adoptopenjdk
- install zulu openjdk
- install Microsoft openjdk
- install openjdk docker image
Download and install Community OpenJDK
Unlike Oracle JDK or AdoptOpenJDK, community openjdk 7 doesn't provide any executables (windows .exe files ) for easy installation. This might make the OpenJDK 7 installation on Windows bit difficult for newbies. To install windows OpenJDK 7, all you have to do is, Download the latest OpenJDK 7 zip/tar file and unzip to a convenient directory on you windows machine. Set the path to downloaded OpenJDK 7 bin directory in the Path Variable.
Here is the step by step procedure to download and install the latest OpenJDK 7 on Windows 10 / Windows 8 / Windows 7.
- Go to https://jdk.java.net/
- Click on Reference Implementation - OpenJDK 7.
- Download the zip / tar distributions based on your operating system
- Extract the downloaded zip / tar file to your convenient directory.
- Example on windows: C:\Avi\tools\java-se-7u75-ri\bin
- Based on your operating system, set the OpenJDK 7 bin path in the environment path
- On windows follow the below steps to set the OpenJDK 7 classpath
- Go to Red Had OpenJDK 7 Download page.https://developers.redhat.com/products/openjdk/download
- Click on the required version of Red Hat OpenJDK 7
- Download the ZIP windows distributions
- Extract the downloaded zip file to your convenient directory.
- Example on windows: C:\Avi\tools\
- Now copy the Red Hat OpenJDK 7 bin path C:\Avi\tools\java-1.8.0-openjdk-1.8.0.232-3.b09.redhat.windows.x86_64\bin and set the Red Hat OpenJDK 7 bin path in the environment path
- On windows follow the below steps to set the Red Hat OpenJDK 7 classpath
- Go to AdoptOpenJDK Download page.https://adoptopenjdk.net/installation.html#installers
- Click on the AdoptOpenJDK installer packages based on your Operating system.
- Windows MSI installer packages
- macOS PKG installer packages
- Linux RPM and DEB installer packages
- Download the ZIP windows distributions
- Extract the downloaded zip file to your convenient directory.
- Example on windows: C:\Avi\tools\
- Now copy the AdoptOpenJDK bin path C:\Avi\tools\OpenJDK8U-jdk_x86-32_windows_hotspot_8u242b08.zip\bin and set the AdoptOpenJDK bin path in the environment path
- On windows follow the below steps to set the OpenJDK 7 classpath
- OpenJDK Developers Guide
- Redhat OpenJDK
- AdoptOpenJDK
- OpenJDK 7 Windows 64
- OpenJDK 8 Windows 64
- OpenJDK 9 Windows 64
- OpenJDK 10 Windows 64
- OpenJDK 17 Windows 64
- OpenJDK 18 Windows 64
- OpenJDK 19 Windows 64
- OpenJDK 20 Installation
- OpenJDK 11 Windows 64
- OpenJDK 12 Windows 64
- OpenJDK 13 Windows 64
- OpenJDK 14 Windows 64
- OpenJDK 15 Windows 64
- OpenJDK 16 Windows 64
- Uninstall Openjdk
- OpenJDK 12 Features
- OpenJDK 11 Features
- OpenJDK 10 Features
- OpenJDK 9 Features
- OpenJDK 8 Features
- OpenJDK 7 Features

Step #2: Install

Step #3: Configure
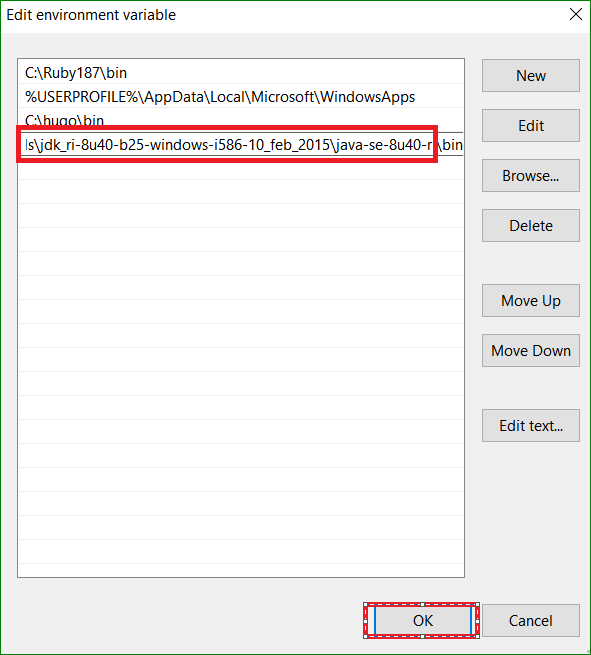
Copy the extracted OpenJDK 7's bin path
C:\Avi\tools\java-se-7u75-ri\bin
Go System Properties and then to Edit the system environmental variables and Click on Environment Variables.

Edit the path variable

Add path variable if its not already added and click OK to finish
Step #4: Verify
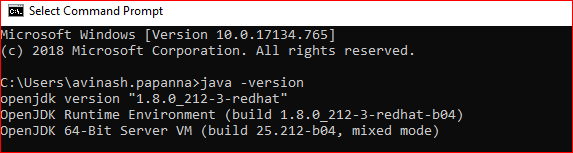
Once the OpenJDK 7 Download and installation is complete, we can verify the installed OpenJDK 7 version using Command Prompt.
Click on Windows Search Button and type cmd and then click on command prompt shortcut.
Go to command prompt and type java -version
The above command prints the OpenJDK 7 version you installed.
Java -version

Congratulations !!! Now you have installed OpenJDK 7 Successfully.
Step #5: OpenJDK Known Issues
Note: Here is the list of OpenJDK known-issues OpenJDK Known Issues
Redhat OpenJDK installation, Click here to read more.
Install RedHat OpenJDK 7 on Windows 10
AdoptOpenJDK installation, Click here to read more.
Install AdoptOpenJDK 7 on Windows 10
Here is the quick video tutorial that demonstrates how to Download and Install OpenJDK 7 on Windows 10.
 Download OpenJDK - here are the OpenJDK versions you might be interested in!

OpenJDK 7

OpenJDK 8

OpenJDK 9

OpenJDK 10

OpenJDK 11

OpenJDK 12


			If you are looking out for earlier OpenJDK versions, go to  OpenJDK Archive
How to Download and Install Red Hat OpenJDK 7 on windows

Unlike community OpenJDK, Red Hat provides OpenJDK build in executable as well as zipped format for easy installation on windows. To install Red Hat OpenJDK 7 on windows, all you have to do is, Download the latest version of Red Hat OpenJDK 7 MSI/ZIP file ( example jdk-8u232-x64 ZIP or jdk-8u232-x64 MSI) from Red hat official site. If you have downloaded OpenJDK 7 MSI, go ahead and install the MSI like any other windows installations and if you have downloaded the ZIP version, unzip the OpenJDK 7 to a convenient directory on you windows machine. Set the path to downloaded OpenJDK 7's bin directory in the Path Variable.
Here is the step by step procedure to install the latest Red Hat OpenJDK 7 on Windows 10 / Windows 8 / Windows 7.


Copy the extracted OpenJDK 7's bin path
C:\Avi\tools\java-1.8.0-openjdk-1.8.0.232-3.b09.redhat.windows.x86_64\bin
Go System Properties and then to Edit the system environmental variables and Click on Environment Variables.
Edit the path variable
Add path variable if its not already added and click OK to finish
Go to command prompt and type java -version
Java -version
How to Download and Install AdoptOpenJDK 7 on windows
AdoptOpenJDK provides an open and reproducible build and test system for OpenJDK source across multiple platforms. AdoptOpenJDK provides OpenJDK binaries for the Java ecosystem.
Here is the step by step procedure to install the latest AdoptOpenJDK on Windows 10 / Windows 8 / Windows 7.
Copy the extracted OpenJDK 7's bin path
C:\Avi\tools\OpenJDK8U-jdk_x86-32_windows_hotspot_8u242b08.zip\bin
Go System Properties and then to Edit the system environmental variables and Click on Environment Variables.
Edit the path variable
Add path variable if its not already added and click OK to finish
Go to command prompt and type java -version
Java -version
Congratulations !!! Now you have installed OpenJDK 7 Successfully.
Read Next :
Archives
Java
- OpenJDK Developers Guide
- Redhat OpenJDK
- AdoptOpenJDK
- OpenJDK 7 Windows 64
- OpenJDK 8 Windows 64
- OpenJDK 9 Windows 64
- OpenJDK 10 Windows 64
- OpenJDK 17 Windows 64
- OpenJDK 18 Windows 64
- OpenJDK 19 Windows 64
- OpenJDK 20 Installation
- OpenJDK 11 Windows 64
- OpenJDK 12 Windows 64
- OpenJDK 13 Windows 64
- OpenJDK 14 Windows 64
- OpenJDK 15 Windows 64
- OpenJDK 16 Windows 64
- Uninstall Openjdk
- OpenJDK 12 Features
- OpenJDK 11 Features
- OpenJDK 10 Features
- OpenJDK 9 Features
- OpenJDK 8 Features
- OpenJDK 7 Features