How to uninstall openjdk on windows

OpenJDK is an open-source implementation of the Java Development Kit (JDK). It is widely used by developers for writing Java applications. However, if you want to uninstall OpenJDK from your Windows or Linux system, you may face some difficulties, especially if you are not familiar with the process.
In this article, we will provide you with a step-by-step guide on how to uninstall OpenJDK from the below operating systems.
Uninstall openjdk on windows
Where is OpenJDK installed on Windows?
Before we proceed with the uninstallation process, it is essential to know the location of the OpenJDK installation on your Windows system. By default, OpenJDK is installed in the "Program Files" directory on your system drive. You can find it by following the below path:
C:\Program Files\Java\jdk-11.0.1
The exact directory name may vary depending on the version of OpenJDK you have installed on your system.
Uninstall OpenJDK Manually :
We can uninstall openjdk manually in the same way as we would uninstall any other programs from Windows System.
Here is the step by step procedure to uninstall openjdk on Windows 10 / Windows 8 / Windows 7.
Uninstall openjdk from Windows 10
- Log on to windows 10 and click Start
- Click on Settings
- Click on System
- Choose Apps & features
- Click on the program to uninstall and then click its Uninstall button. follow the instructions to complete the uninstall.
Uninstall openjdk from windows 8
- Log on to windows 8 and click Start.
- Click on Search box and type control panel.
- Click on control panel and select Uninstall a Program from the Program Category.
- Select the openjdk and right click and then click on uninstall.
- Click Yes to Confirm the uninstall process.
Uninstall openjdk from windows 7
- Log on to windows 7 / Vista and click Start.
- Click on control panel.
- Click on control panel and select programs.
- Click on Programs and Features and Select the openjdk to be uninstalled.
- Click on Uninstall button to finish uninstall openjdk.
Uninstall openjdk from windows - By removing openjdk bin path from System PATH Variable
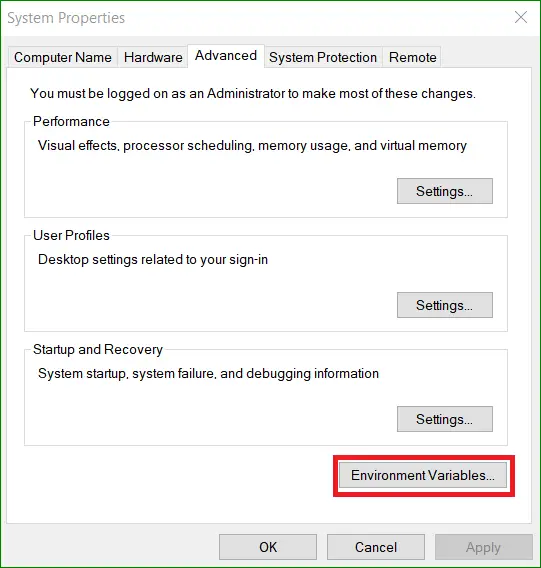
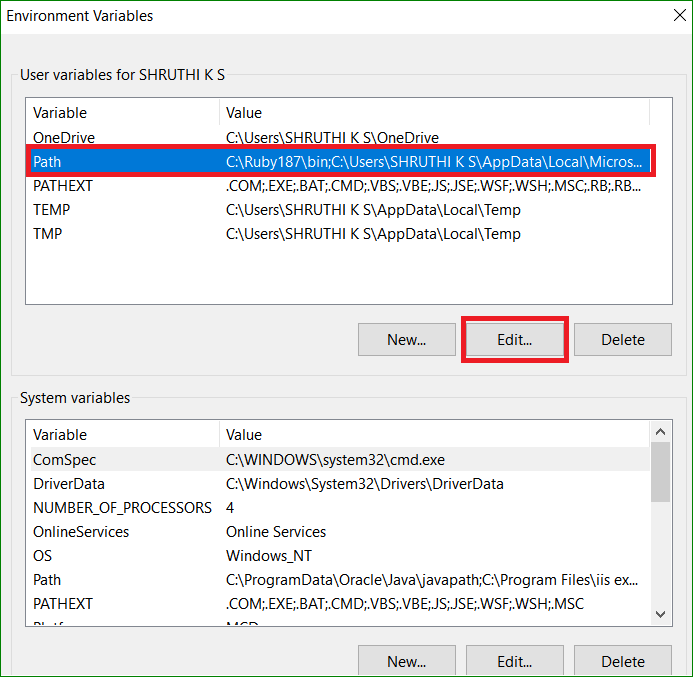
Go System Properties and then to Edit the system environmental variables and Click on Environment Variables.

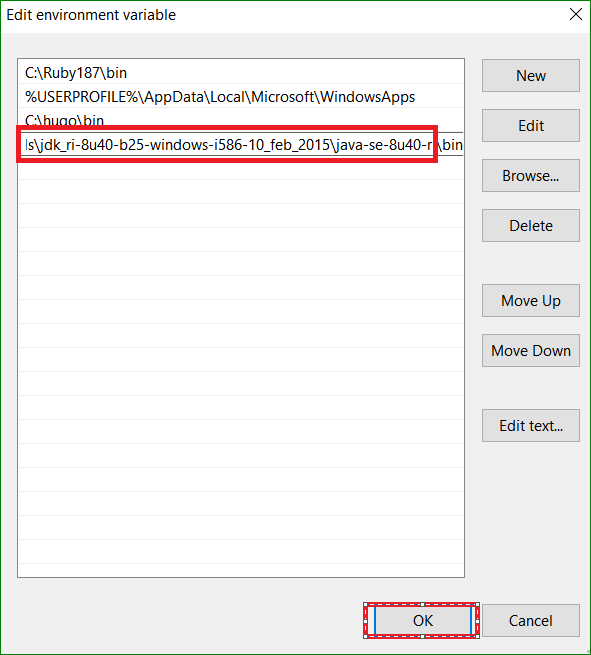
Edit the path variable

Delete path variable if its not already removed and click OK to finish.

Go to command prompt and type java -version and confirm the uninstall
Java -version
This command will display the version of Java installed on your system. If OpenJDK has been successfully uninstalled, this command should not return any output.
Uninstalling OpenJDK on Linux Redhat
Uninstalling OpenJDK on Linux Redhat is a bit different from Windows. You can use the following commands to remove OpenJDK from your system:
Step 1: Open the terminal and type the following command:
sudo rpm -qa | grep openjdk
This command will list all the installed OpenJDK packages on your system.
Step 2: To uninstall OpenJDK, use the following command:
sudo yum remove
Replace
sudo yum remove java-11-openjdk
Step 3: Press Enter and wait for the uninstallation process to complete.
Step 4: Once the uninstallation process is complete, you can verify that OpenJDK has been removed by running the following command:
java -version
This command will display the version of Java installed on your system. If OpenJDK has been successfully uninstalled, this command should not return any output.
Conclusion
Uninstalling OpenJDK from your system is a simple process that can be done in a few easy steps. Whether you are using Windows or Linux, the process remains the same.
By following the step-by-step guide provided in this article, you can easily uninstall OpenJDK 11, OpenJDK 8, or any other version of OpenJDK from your system.
It is essential to remember that you should always double-check the installation directory and take a backup of your data before proceeding with the uninstallation process.